前言
Android 中 canvas 能画出来的东西鸿蒙的 canvas 还画不了,不大可能吧?有个朋友问鸿蒙应用中想实现波浪效果,应该咋画?这个问题,你能在 Android 上用 canvas 画出来,在鸿蒙里面用 canvas 画不出来?还是 api 不熟悉吧?
开始
波浪效果嘛,首先想到的是正弦、余弦函数、贝塞尔曲线,还有一个傅里叶变换,不过这个有点搞不定。这里选择使用贝塞尔曲线,因为之前在 Android 中画过,应该可以很丝滑的迁移过来
先复习一下在 Android 中怎么实现:https://blog.huangyuanlove.com/2019/01/20/%E8%87%AA%E5%AE%9A%E4%B9%89View-%E8%B4%9D%E5%A1%9E%E5%B0%94%E6%9B%B2%E7%BA%BF%E3%80%81Shader/
确认起始点,确认终点,计算控制点,然后调用 api 划线,最后填充一下就好了。
怎么动起来?Android 这边用的动画,其实用 handler 或者其他东西搞个定时更新也行。
先看效果图
看下鸿蒙对应的 api,目前开放的最新的HarmonyOS文档是 3.1/4.0的,对应地址是这个 https://developer.harmonyos.com/cn/docs/documentation/doc-references-V3/ts-canvasrenderingcontext2d-0000001478181441-V3#ZH-CN_TOPIC_0000001573928937__quadraticcurveto
目前开放的最新的 OpenHarmony 文档是4.0 的,对应地址在这里 https://docs.openharmony.cn/pages/v4.0/zh-cn/application-dev/ui/arkts-drawing-customization-on-canvas.md/#%E7%94%BB%E5%B8%83%E7%BB%84%E4%BB%B6%E5%B8%B8%E7%94%A8%E6%96%B9%E6%B3%95
步骤都差不多,只不过鸿蒙中没有画笔的概念,需要对CanvasRenderingContext2D对象进行操作设置,包括设置线条颜色、线条宽度、图型填充颜色等。
想要画线、画出各种形状,可以直接操作CanvasRenderingContext2D对象,也可以创建Path2D对象进行操作。其余 api 可以查看对应的文档。
设计
这还有啥好设计的,直接抄移植 Android 上面的实现就好了
由于需要动起来,为了避免移动后左右有空白,这里需要多画一个波浪
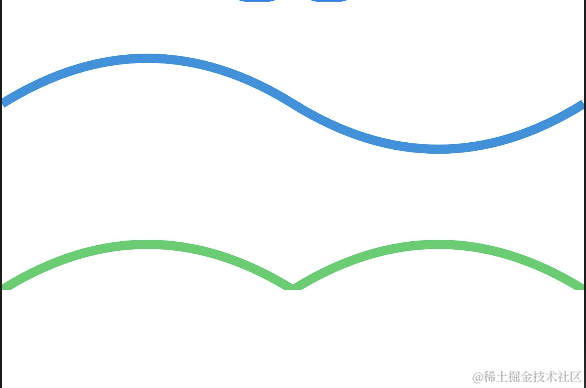
这里需要注意的是,我们需要上面这条蓝色的线,而不是下面这条绿色的。
在 Android 中画二阶贝塞尔曲线有两个 api,一个是
public void rQuadTo(float dx1, float dy1, float dx2, float dy2)
这个表示的是控制点和终点相对于上一个控制点和终点的偏移量
另外一个是
public void quadTo(float x1, float y1, float x2, float y2)
这个表示是控制点和终点的绝对坐标值
但在鸿蒙中没有找到对应的 api,我们可以自己计算一下:这里的控制点的横坐标是起点和终点的中间值,控制点的纵坐标取的是波浪高度
所以上面两条线的画法是这样的
1
2
3
4
5
6
7
8
9
10
11
12
13
14
15
16
17
18
19
20
21
22
23
24
25
26
27
28
29
30
31
32
| Canvas(this.canvasRendering).width("100%").height("30%")
.onAreaChange((oldValue,newValue)=>{
this.canvasRendering.fillStyle = "#39d167"
this.canvasRendering.strokeStyle = "#39d167"
this.canvasRendering.lineWidth = 10
let canvasWidth = parseInt(newValue.width.toString())
let canvasHeight = parseInt(newValue.height.toString())
let waveWidth = canvasWidth/2
let waveHeight = 100
let baseHeight =canvasHeight
let path:Path2D = new Path2D()
path.moveTo(0,baseHeight)
path.quadraticCurveTo( waveWidth/2,baseHeight-waveHeight ,waveWidth,baseHeight)
path.quadraticCurveTo(waveWidth+waveWidth/2, baseHeight-waveHeight ,canvasWidth,baseHeight)
this.canvasRendering.stroke(path)
path = new Path2D()
baseHeight /=3
path.moveTo(0,baseHeight)
path.quadraticCurveTo( waveWidth/2,baseHeight-waveHeight ,waveWidth,baseHeight)
path.quadraticCurveTo(waveWidth+waveWidth/2, baseHeight+waveHeight ,canvasWidth,baseHeight)
this.canvasRendering.strokeStyle = "#1b91e0"
this.canvasRendering.stroke(path)
})
|
实现
实现也一样,直接抄 移植过来就好了,对应的 api 怎么用也搞定了,代码如下
1
2
3
4
5
6
7
8
9
10
11
12
13
14
15
16
17
18
19
20
21
22
23
24
25
26
27
28
29
30
31
32
33
34
35
36
37
38
39
40
41
42
43
44
45
46
47
48
49
50
51
52
53
54
55
56
57
58
59
60
61
62
63
64
65
66
67
68
69
70
71
72
73
74
75
76
77
78
79
80
81
82
| @Component
export struct WaveView{
private settings: RenderingContextSettings = new RenderingContextSettings(true)
private canvasRendering: CanvasRenderingContext2D = new CanvasRenderingContext2D(this.settings)
private canvasHeight: number = -1
private canvasWidth: number = -1
@State private dx: number = 0
private waveHeight = 50
private baseHeight = 300
private waveWidth = 0;
private intervalTimer: number = 0
drawWave() {
this.dx += 4
if (this.dx >= this.waveWidth) {
this.dx = 0
}
this.canvasRendering.clearRect(0, 0, this.canvasWidth, this.canvasHeight)
if (this.waveWidth == 0) {
this.waveWidth = this.canvasWidth / 2
}
let path: Path2D = new Path2D()
path.moveTo(-this.waveWidth + this.dx, this.baseHeight)
let startX = -this.waveWidth + this.dx
while (startX < this.canvasWidth + this.dx) {
let endY = this.baseHeight
path.quadraticCurveTo(startX + this.waveWidth / 4, this.baseHeight - this.waveHeight, startX + this.waveWidth/2, endY)
path.quadraticCurveTo(startX + this.waveWidth / 4*3, this.baseHeight + this.waveHeight, startX + this.waveWidth, endY)
startX += this.waveWidth
}
path.lineTo(startX ,this.canvasHeight)
path.lineTo(0 ,this.canvasHeight)
path.lineTo(0 ,this.baseHeight + this.waveHeight)
this.canvasRendering.fillStyle = "#39d167"
this.canvasRendering.strokeStyle = "#39d167"
this.canvasRendering.lineWidth = 10
this.canvasRendering.fill(path)
}
build() {
Column() {
Canvas(this.canvasRendering).layoutWeight(1).width("100%")
.onAreaChange((oldValue, newValue) => {
this.canvasWidth = parseInt(newValue.width.toString())
this.canvasHeight = parseInt(newValue.height.toString())
this.baseHeight = this.canvasHeight - 300
this.waveWidth = this.canvasWidth / 2
this.drawWave()
})
Row() {
Button("开始").onClick(() => {
if (this.intervalTimer != 0) {
clearInterval(this.intervalTimer)
}
this.intervalTimer = setInterval(function(){
this.drawWave()
}.bind(this), 10)
})
Blank().width(15)
Button("停止").onClick(() => {
if (this.intervalTimer != 0) {
clearInterval(this.intervalTimer)
}
})
}.margin({ bottom: 10 })
}
}
}
|
上面就是完整的代码了,github 仓库在这里:https://github.com/huangyuanlove/HelloArkUI/blob/main/entry/src/main/ets/pages/playground/WaveView.ets
https://github.com/huangyuanlove/HelloArkUI/blob/main/entry/src/main/ets/pages/playground/WaveLinePage.ets
进化
稍微修改一下就可以做成其他效果
比如将baseHeight也用@State修饰一下,同时在定时器中更新一下,就可以实现注水效果
再将画布裁成圆形,就是一个简单的充电、内存加速球效果。再做点随机的粒子效果或者多画几条浅色的波浪线,效果就更好了
以上